About Weighted Columns
What are weighted columns?
A 'weighted column' is a type of calculated column in the Blackboard Grade Center. It displays a grade that is calculated by applying weight (in the form of percentages) to a set of your students’ assessment grades. This set is comprised of assessment columns, calculated columns, Grade Center categories, and other inputs that you select, and each of those items are weighted according to the percentage values that you choose. This allows you to ascribe more or less importance to the desired assessments when calculating the final grade. The following types of items may be included in the weighted column's calculation:
- Automatically-created grade columns, like those that appear when you create an assessment (ex: 'Exam 1')
- Manually-created grade columns, like other calculated columns (ex: 'First Quarter Total')
- Any Grade Center categories, both default and user-added (ex: 'Group Work')
Note: Categories that are set to not be included in Grade Center calculations will be excluded.
Each column/category/etc. that is added can be weighted equally or proportionally, as long as the total of all inclusions equals 100%.
Things to know:
- A weighted total column is included by default in new Blackboard course sites.
This weighted total column may be found in Smart View > 'Final Grade View'. It will be empty by default; you must select the columns and categories that you would like to include in your calculation. You can also rename the column, change its settings, change which columns and categories are included, or delete it entirely.
- Weighted totals are calculated based on percentages — not based on grading schemas or letter grades.
A 'grading schema' is a system that maps a set range of percentages to a particular label (ex: 94% - 100% = 'A'). These schemas are used for display purposes. They do not have an impact on the weighted total's underlying calculations, which are based completely on percentages -or- points / points possible. Columns included in the weighted total are not displayed using the same grading schema as the input grade values.
Example of a weighted column in action:
You can create a variety of weighted columns, including a structure where one weighted column contains multiple other weighted columns. For example, to calculate the final grade for the year, you can create a weighted column that uses each of the preceding quarters' weighted columns along with the midterm and final test grading columns to calculate a final grade. Below, each of the quarters is represented in a weighted column containing all of the assessments from that time frame. The quarters and tests may be combined in another weighted column to calculate the final grade, which can be described using the formula below:
('Quarter 1' = 15%) + ('Quarter 2' = 20%) + ('Quarter 3' = 15%) + ('Quarter 4' = 20%) + (2 semester tests = 30%) = (Year final grade*)
*In a new course, the default total column is also the default 'external grade column'. But, you can select any column (including those you have created) to be the external grade. This is the grade that will be reported to Campus Connection if you use the automatic transfer process.
Create weighted columns
Steps:
To get started, please see the steps below. For more detailed information about this process, or calculated grade columns in general, please see Blackboard's help page.
- Open your course in Blackboard. In the menu on the left, click 'Grade Center', and select 'Full Grade Center'.
- In the Full Grade Center, in the menu at the top of the page, click 'Create Calculated Column', then from the drop-down menu, select 'Weighted Column'. This will open the column creation page.
- Near the top of the page, enter a name for your new column and select the primary/secondary display type. Then, scroll down to the 'SELECT COLUMNS' section.
- In the 'SELECT COLUMNS' section: You can click to highlight the desired item (either column or category) from the list on the left, then click the small arrow buttons to move it to the 'Selected Columns' box on the right. The right-most box will need to contain all of the items that you would like to include in your weighted column calculation.
- After you have added items to the 'Selected Columns' box on the right, you will be presented with a variety of options that can be used to fine-tune your weighted calculation. Please see the 'Column option descriptions' section below from our information about how to best configure each setting.
- In the '%' text boxes, input the desired percentage for each selection — the total must equal 100 percent. After you assign the last percentage, click anywhere in the box to update the percentage located below the 'Selected Columns' box, in the 'Total Weight' field.
- Confirm that everything is set up correctly, then scroll down and click the 'Submit' button (in the bottom right corner) to create and add it to your course's Grade Center.
Column option descriptions:
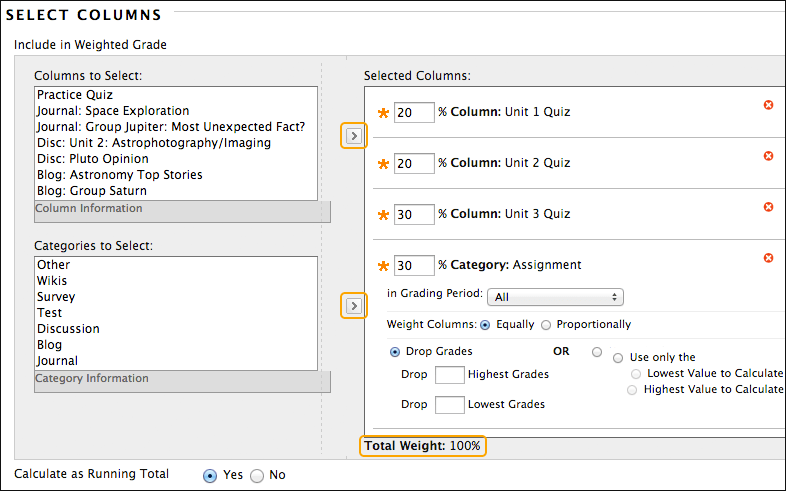
- 'In Grading Period'
If you selected a category for the calculation, you can limit the columns used by selecting a particular grading period.
- 'Weight Columns'
Select how to weigh columns within the category:
'Equally' will apply equal value to all columns within a category.
'Proportionally' will apply the appropriate value to a column based on its points, compared to other columns in the category.
- 'Drop Grades' (highest/lowest)
Removes a number of either the highest or lowest grades for each category from the calculation. If you don't input a value in the boxes, no grades will be dropped.
- 'Use only the' (highest/lowest)
Removes all grades from the calculation except for the best or worst score.
- Icon - Red Circle 'X'
To remove a selection from the 'Selected Columns' box, click the red 'X' to its right.
- Additional Information
If you delete a column that is included in the calculation for a weighted column, the percentage assigned to the deleted column is removed. In the 'Selected Columns' box, the Total Weight will no longer equal 100%. The calculation does balance itself, but it won't necessarily be based on the percentages you assigned, because a column is missing. The system doesn't update percentages in the 'Selected Columns' box, but the grade that appears in the weighted column in the Grade Center is based on 100%.
Equal and proportional weighting:
- Equal weighting gives each item equal weight when determining the composite grade.
When the columns and categories you select for the weighted column have different point values, equal weighting converts them to percentages. These percentages are averaged to obtain an equal value for each of the items included in the weighted column.
- Proportional weighting maintains the larger impact of items with a higher point/percentage value when determining the composite grade.
This option first adds the raw scores of the included columns and categories. Then, the system divides that result by the total points possible to obtain a percentage for each item in the weighted column.
Running totals for weighted columns
On the weighted column configuration page, you will have the option to 'Calculate as Running Total'.
- If you select 'Yes' for this option, only columns and categories that have been submitted/graded will be included in the weighted column's total (the number that you see in the Grade Center).
- If you would like the number displayed in the Grade Center to include all of the points, including points for assessments in the future/that have not yet been graded, you should select 'No' for this option.
*To illustrate which each option does in practice, please see the 'Example' section below. (This demonstration uses categories, but the same principles apply if you select columns instead of categories when creating the column.)*
Example
A class's weighted column contains three items: 'Category A', 'Category B', and 'Category C'. They are each worth 100 points, but Category C does not have any submissions or scores, yet.
| |
Category A
|
Category B
|
Category C
|
| Weight |
40% |
40% |
20% |
| Points Achieved |
90 |
75 |
- |
| Points Possible |
100 |
100 |
100 |
| Weighted Value |
90 pts * 40% = 36 |
75 pts * 40% = 30 |
- |
'Yes' Option: Calculated as Running Total = 82.5%
When calculated as a running total, the weighted column's total percentage is calculated by taking the sum of the weighted values of category A and B and multiplying by 100/80. The denominator of 80 is the summed weights of only the categories that contain scores (40 + 40 = 80).
(36 + 30) * 100/80 = 82.5%
'No' Option: NOT Calculated as Running Total = 66%
When not calculated as a running total, the weighted column's total percentage is calculated by summing the weighted values for categories A, B, and C and multiplying by 100/100. The denominator of 100 is the summed weights of all categories — which is always 100.
(36 + 30 + 0) * 100/100 = 66%
Contact Us
Chat with Tech Support Submit a Ticket Call 701-777-2222