In your Original course, you can create groups one at a time or in sets. After you create a group, you can edit the group's tools, name, availability, and members.
You can't create course groups in the Ultra Course View, but you can create group assignments.
Each group has its own homepage with links to tools to help students collaborate. Only you and group members can access the group tools.
You can create groups, enroll students in groups, and edit or delete groups in your course.
Group enrollment methods
You can enroll students in groups in three ways. Students can't unenroll themselves from groups.
- Manual Enroll allows you to assign each student in your course to a group. Manual enrollment is available for both single groups and group sets.
- Random Enroll is available for group sets only. It automatically distributes students into groups based on your settings for maximum members per group or total number of groups. Random distribution applies only to students who are currently enrolled in your course. You can enroll additional students manually.
- Self-Enroll allows students to add themselves to a group with a sign-up sheet. Self-enrollment is an option available for both single groups and group sets.
More on choosing a group enrollment method
Access groups
Students can access groups in two ways:
- In a new course, select the Groups link on the course menu.
- In the course menu, go to Tools > Groups.
More on the best ways to present groups
Create a single group
- On the Groups page, select Create.
- In the Single Group list, select Self-Enroll or Manual Enroll.
- Type a name and optional description. Make the group visible to students.
- Select the check boxes for the course tools you want to make available to the group.
- If you want to grade student submissions for blogs, wikis, and journals, select the Grade option and type Points possible.
- Select the check box for Allow Personalization to let students add personal modules to the group homepage. Modules are only visible to the group member who added them.
- Optionally, select the check box to create a smart view for this group.
Enroll students in a group
- If you chose Self-Enroll, type a name and provide instructions. You might tell students that they can't unenroll themselves from groups. Type the Maximum Number of Members and select any other options you want to include.
-OR-
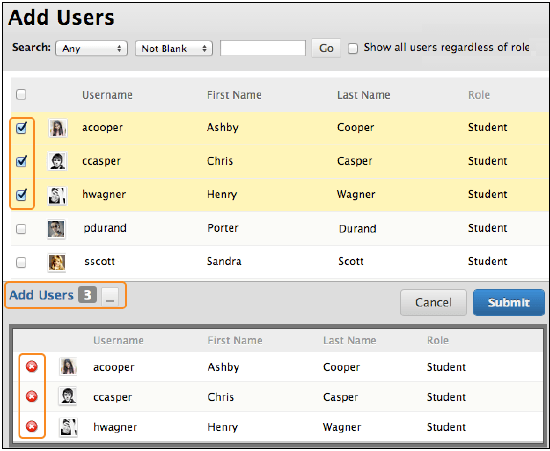
If you chose Manual Enroll, search for and select students from the Add Users pop-up window.
Your selected group members appear in the bottom area with a number showing the total count. Select the Show List icon, represented by a full square, to open the Add Users area to view your selections. To remove a user, select the X next to their name.
- Select Submit.
The newly created group appears on the Groups listing page.
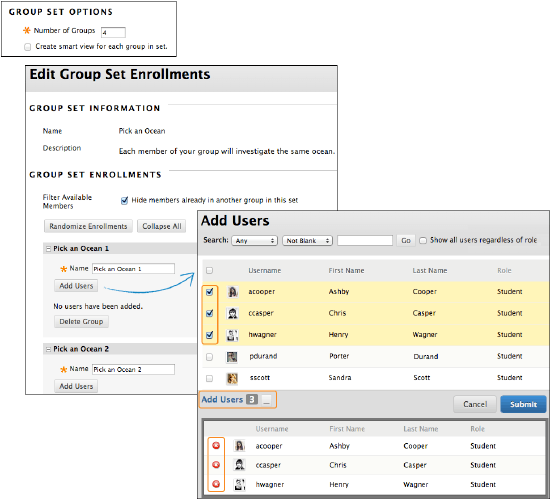
Create a group set
- On the Groups page, select Create.
- In the Group Set list, select Self-Enroll, Manual Enroll, or Random Enroll.
Use the same steps as creating a single group. Then, based on the enrollment option you choose, you can choose from these:
- Self-Enroll: Type a name and instructions for the group. Enter the Maximum Number of Members and select any other options you want to include.
- Random Enroll: Type the Number of Students per Group or the Number of Groups you want to create. Select an option to Determine how to enroll any remaining members in the groups.
- Manual Enroll: Type the Number of Groups to create. On the next page, select Add Users for each group to make your selections.
Your selected group members appear in the bottom area with a number showing the total count. Select the Show List icon, represented by a full square, to open the Add Users area to view your selections. To remove a user, select the X next to their name.
Remove a group member
You can remove members from a course group.
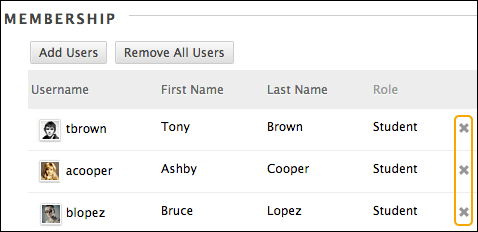
Only course instructors and administrators can remove group members. Students can't remove themselves from a group or other students from student-created groups.
- On the Groups page, select Edit Group in the group's menu.
- On the Edit Group page, select the X in a member's row to remove the user from the group. Select Remove All Users to delete all members from a group.
- Select Submit.
The group member is now removed from the group. To verify that a user has been removed, go to the group homepage to check the list of members.
Manage groups
On the Groups listing page, you can create groups as well as edit and manage them.
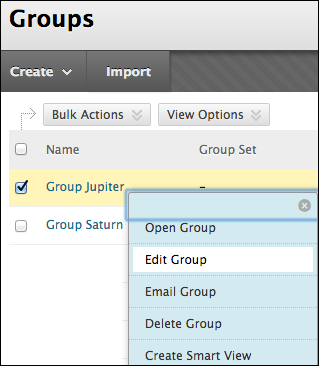
Each group's menu provides quick access to the group homepage and group email. You can also access the options to edit group properties, delete groups, and create smart views.
A smart view is a focused look at the Grade Center. It shows only the columns that match a set of criteria, and the view is saved for continued use. When the Grade Center includes a great number of students and columns, you can use smart views to quickly find data.
More on smart views
When you edit a group, you can add or remove members as well as change its name, availability, and tools.
You can allow students to create their own self-enroll groups. On the Groups page, select Group Settings and make your selections.
Delete a group
You can delete a group you no longer need.
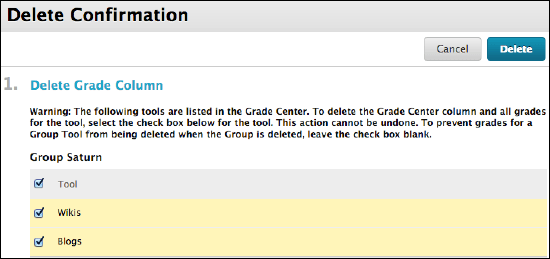
You can retain any group-related grade columns that exist in the Grade Center such as gradable group blogs, journals, or wikis. On the Delete Confirmation page, don't select the check boxes for any columns that you need to preserve.
Contact Us
Chat with Tech Support Submit a Ticket Call 701-777-2222