To eliminate potential double entry of Grade Center data, you can perform offline grading and import grades into the Grade Center. You can also upload grades from external sources such as an Excel spreadsheet or a comma-separated values (CSV) file. You must format data specifically to upload correctly and to synchronize with existing Grade Center data.
You can also use Grades Journey to save and share grade information for individual courses and assignments if your institution uses this feature.
Format external files
To synchronize external data to Grade Center data, unique identifiers are necessary for each student and for each column in the Grade Center. The unique identifier used for each student is the student's username. The unique identifier for each column is a column ID number. Column ID numbers are generated by the system and shouldn't be changed or deleted. Columns that don't have column ID numbers in an uploaded file will create new columns in the Grade Center.
Columns that you add to the Grade Center from an external file are added as text columns with points possible equaling zero (0). Text columns can't be included in calculated columns, such as weighted, total, average, and minimum/maximum. After the upload, convert text columns to other columns types and add points possible.
Each data file you upload to the Grade Center requires a header row with one record per line subsequently.
The format of the data file uploaded to the Grade Center is determined by the type of delimiter you use to parse the data into separate columns. Data files are tab-delimited with a file extension of XLS or comma-delimited with a file extension of CSV.
Data in each column of comma-delimited files must be contained within a quote character-the most common is quotation marks ( " " ). Data in each column of tab-delimited files doesn't require a quote character.
Tips for working with external data
When you upload data to the Grade Center, we recommend that you use tab-delimited files. When you use tab-delimited files, you don't have to use quote characters and you can open the files directly in Microsoft® Excel®.
To obtain a file that is formatted correctly for uploading, download the full Grade Center first and open it in a text editor or spreadsheet application. Existing columns have column ID numbers that must be included in future uploads.
Batch file standard
Batch files are TXT files that hold large quantities of information to upload to the system. Each batch utility contains specific instructions on creating the batch file. These batch file standards are universal:
Upload a file to the Grade Center
Any file you upload that contains an "Incomplete" for a grade entry will be set to null, with no grade or text displayed. Any file you upload that contains "Complete" for a grade entry will be set to an override grade of the maximum points possible (100% for a grade item) in a column that has the primary display of Complete/incomplete. Any file you upload that contains a numeric entry will be a numeric entry.
- Access the Work Offline menu and select Upload.
- Browse for the file on your computer or from the Content Collection if you have access to it.
- Select the delimiter type: Comma, Tab, or Auto. If you choose Auto, the system attempts to automatically detect the delimiter used in the selected file.
- Select Submit to upload the file.
- On the Upload Grades Confirmation page, review the list of data from the file you want to upload. Clear the check boxes for any data to be excluded from the upload. With this method, you can upload only the columns of data you want from the file.
Review the Data Preview column to check that the correct data is being uploaded. Data that appears incorrectly can denote an improperly formatted file. The data preview only shows a sample of the data in each column in the file.
- Large files take significant time to process and a warning message appears for files that need extra time to process. To avoid long processing times, break up large files into separate uploads.
- Select Submit to confirm and upload the file.
Download grades from the Grade Center
You can download full or partial data from the Grade Center.
- Access the Work Offline menu and select Download.
- Select the data to download as described in this table.
| Option |
Description |
| Full Grade Center |
Contains all columns and associated data. Comments won't be included, and you can't add them offline. |
| Selected Grading Period |
From the menu, select a grading period. You must create grading periods before you can choose any. |
| Selected Column |
From the menu, select one column and its data. Select the check box to Include comments for this Column. Comments will download from the Quick Comment feature or Manual Override tab. You can edit included comment text offline. |
| User information |
Columns containing student data such as username are included. |
- Select the file delimiter, Comma or Tab.
- Select whether or not to Include Hidden Information in the downloaded data. Hidden information includes columns and students you hid from the view in the downloaded file.
- Select the location for the download. Browse to select a folder in the Content Collection if you have access to it.
- Select Submit.
- On the next Download Grades page, select Download and save the file. Don't change the file name while saving because the Grade Center needs the information it contains to deliver it to the appropriate column when uploading.
Download grade history data
- Access the Reports menu and select View Grade History.
- On the Grade History page, select Download and select the Delimiter Type for the file.
- Select Yes to Include Comments or No to exclude them from the download.
- Select Submit.
- Select Download to save the file to your computer.
Working offline
After you download the file and open it in the appropriate editing software, you can make changes. If you download the full Grade Center, you can change and add grades, and save the file for uploading. If you downloaded a single column, you can add or change grades and comments, and save the file for uploading.
Edit comments
Comments are downloaded only when you select a single Grade Center item and the option to include its associated comments. The comments downloaded and uploaded are for the grade-accessed in the Quick Comment feature or Manually Override tab. The comments aren't for the attempt-accessed on the View Attempt or grading pages.
Four comment-related columns are included in the downloaded file. If you added comments online, those will be included in the download. Otherwise, you may add comments offline and upload them to the full Grade Center to appear in the Quick Comments feature or the Manually Override tab.
Add or edit comments in the Grading Notes and Feedback to User columns.
Links within comments to rich media, such as images or sound files, should be inserted and edited online.
When your edits to grades and comments are complete, save the file, return to the full Grade Center, and upload.
Comment-related columns
| Column Name |
Description |
| Grading Notes |
Grade Center column-specific comments visible only to an instructor or TA |
| Notes Format |
Smart text, plain text, or HTML |
| Feedback to User |
Grade Center column-specific comments visible to students |
| Feedback Format |
Smart text, plain text, or HTML |
Feedback format options
| Format Type |
Description |
| Smart text |
Automatically recognizes a link, the Enter key as a paragraph tag, and accepts HTML tags. |
| Plain text |
Displays text as it is written in the text area. Plain text doesn't render HTML code. HTML code will appear as text. |
| HTML |
Displays text as coded by the user with HTML tags. |
About Grades Journey
Starting with the Q4 2015 release of Blackboard Learn 9.1, institutions can use Grades Journey to easily transfer student grade data from Blackboard Learn to their Student Information Systems (SIS). You can use Grades Journey to save and share grade information for individual courses and assignments if your institution uses this feature.
Ready to export grades? It’s easy to start the transfer process within the Grade Center. Before you begin, be aware that you many only transfer grades if your administrator has configured Grades Journey to allow your role to do so. If you have trouble, contact your administrator to make sure you have the appropriate permissions to use this feature.
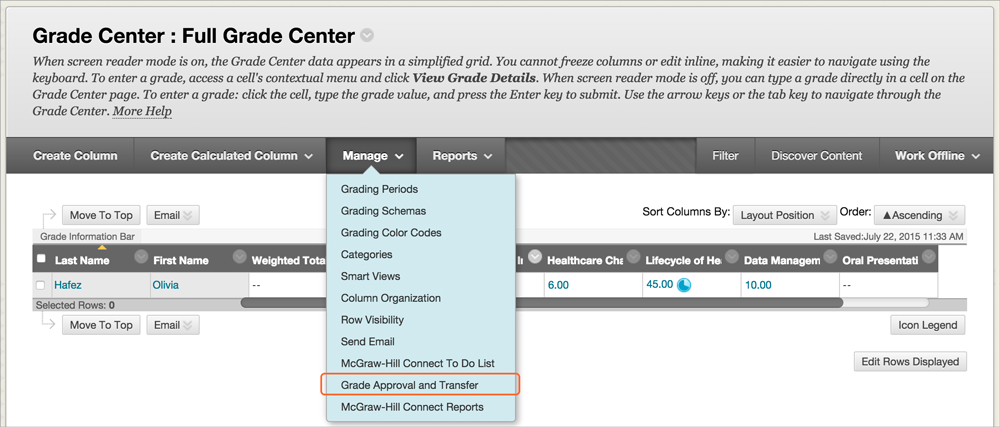
To start extracting grade information, go to your course’s Grade Center and select Grade Approval and Transfer in the Manage menu. What you see next depends on the settings your administrator has chosen.
Lock on Approval
Administrators can enable a setting in Grades Journey that locks the Grade Center when you begin transferring grade information. The setting ensures that the grade data in BlackboardLearn stays consistent with the information contained in the grade extract file.
If this setting is enabled for your institution, a warning appears that says your Grade Center will be locked if you continue with the transfer. You'll still be able to see the grades for that course, but it's a read-only view and you won’t be able to edit.
See something that looks off after you extracted the grade information? If you notice any incorrect information or otherwise need to update it, contact your administrator to ask them to unlock the Grade Center for that course.
Grade Extract History
If your administrator hasn't enabled the Lock on Approval setting, you're brought to a Grade Extract History page after you select Grade Approval and Transfer. This page displays grade extract activity for this course.
The Action column describes what happened to the grade data, whether it was Extracted, Scheduled, or Unlocked. In each of the rows, you can also see who performed the action, when it was performed, and whether or not it was successful.
To continue the grade extract process, select Schedule Extract at the bottom of the page. A message appears to confirm that you want to release the grades for transfer. Select OK to continue or Cancel to go back. The extract occurs at the next scheduled interval, which is also a setting chosen by your administrator.
Contact Us
Chat with Tech Support Submit a Ticket Call 701-777-2222