In the Grade Center, the columns for students' first and last names appear first by default. Columns for gradable items and calculations of those items appear across the page. You decide which columns appear and in what order. You can also filter your view.
Filter your view of the Grade Center
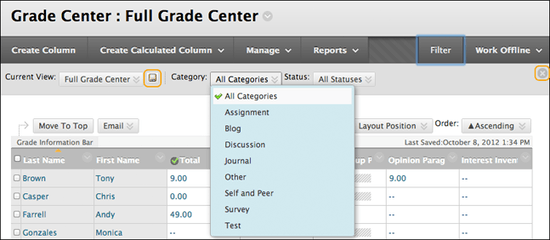
You can narrow your view of the Grade Center data. Select Filter to expand the field and select an option from these menus:
- Current View: Includes the Full Grade Center view, smart views, and grading periods. You can select a view to use as the default view with the Set Current View as Default icon.
- Category: Includes all default categories and those you've created.
- Status
Watch a video about customizing the Grade Center
The following narrated video provides a visual and auditory representation of some of the information included on this page. For a detailed description of what is portrayed in the video, open the video on YouTube, navigate to More actions, and select Open transcript.
Video: How to Customize the Grade Center shows how to customize the view of the Grade Center by hiding a column, accessing the Column Organization page, showing a hidden column, and reordering columns.
Hide user rows
You can hide user rows to reduce the number of rows in the Grade Center grid and help you focus on specific data. When you hide user rows, the data is retained and you can show them at any time. You can hide user rows in two ways:
- Access each user's menu and select Hide Row. You can also select Hide Other Rows to remove all but the user's row from view.
- On the Row Visibility page, you can hide and show user rows. Only your view of the Grade Center grid is affected. Student availability isn't affected. Access the page from the Manage menu.
If you've made a user unavailable on the Users page in the Control Panel, the User Unavailable icon appears in the user's first cell in the Grade Center. But, the row isn't hidden in the grid. Unavailable users can't access your course.
Organize columns in the Grade Center
On the Column Organization page, you can view all the columns in the Grade Center on one page. You can reorder the columns and the changes you make appear in the Grade Center grid.
On this page, each column in the Grade Center grid becomes a row. For example, the Last Name column in the grid becomes the Last Name row on the Column Organization page. The first column in the grid is the first row on this page. The order of rows on this page is the same as the order of columns in the grid.
On this page, you can organize the Grade Center columns in these ways:
- Reorder columns quickly with the drag-and-drop function.
- Freeze or unfreeze columns in the first table. If you freeze a column, it remains stationary when you scroll through the Grade Center view.
- Hide or show multiple columns.
- Change a grade column's category or grading period.
Changes you make on this page don't affect what students see in My Grades. For example, if you choose to hide a column on this page, the column is only hidden from your view in the Grade Center grid. You must edit an existing column's settings to hide a column from students in My Grades or select Show/Hide to Users in a column's menu. In the Grade Center grid, the Column Not Visible to Users icon appears in the column header for a column hidden from students.
Access the Column Organization page
In the Grade Center, access the Column Organization page from the Manage menu.
On the Column Organization page, the rows are organized in tables. You can move most rows to any table, and you can reorder grading period tables.
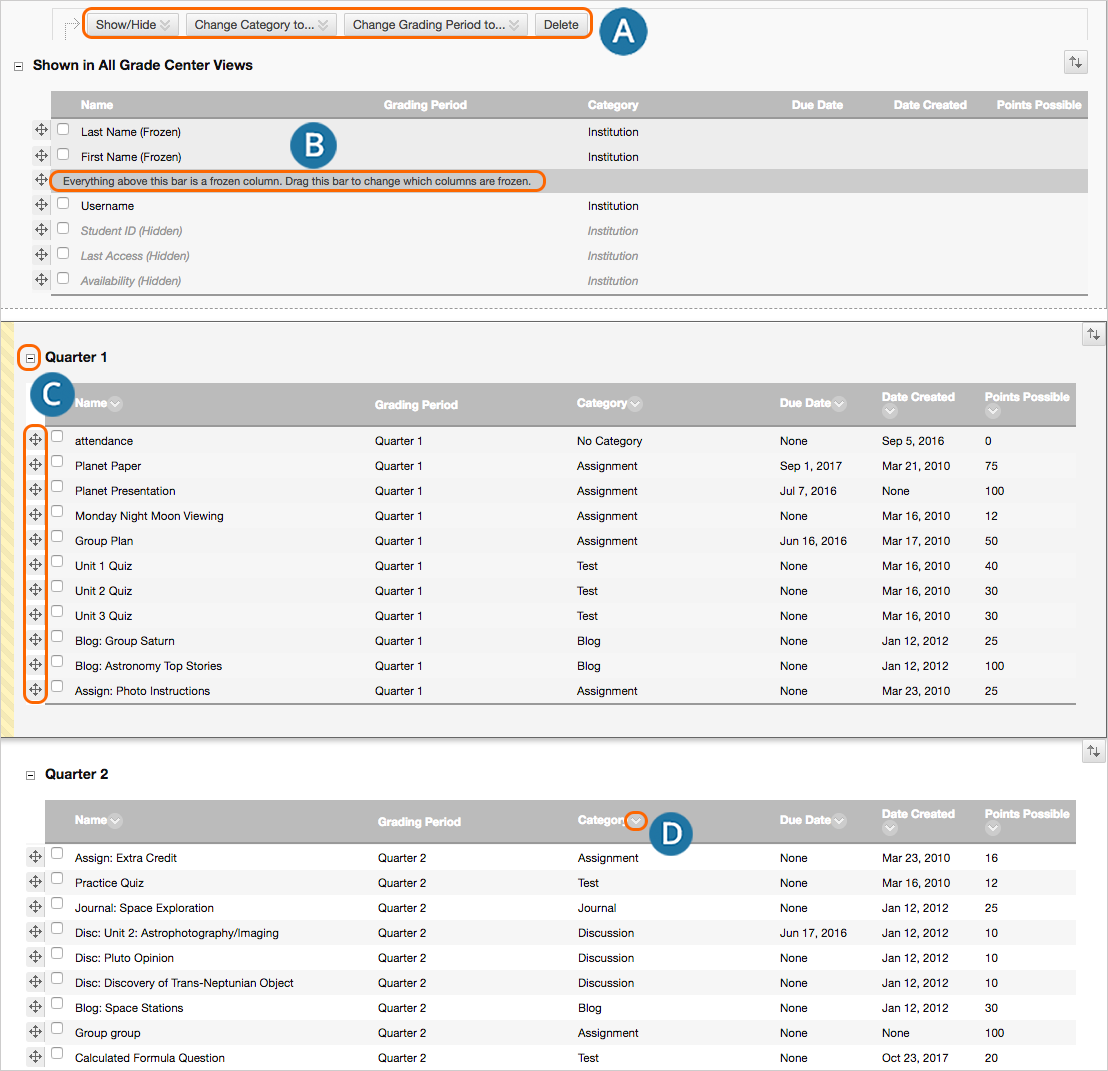
- Hide, show, or move columns. Select columns' check boxes and make a selection from a menu. Hidden columns don't appear in the Grade Center grid, but all data is retained.
- First table. Shown in All Grade Center Views is always first, and you can't move it. The columns in this table pertain to user information, and you can't move them to another table. If shown, these columns always appear on the left side of the grid. You can also freeze columns in the first table so that they remain stationary as you scroll in the grid. Drag the bar that states: Everything above this bar is a frozen column or drag a column above the bar to freeze it. Use this feature to easily match up individual students with their data across the Grade Center.
If you move a column to the first table, it appears in all views of the Grade Center. For example, you can move the total column to the first table. Then, if you change your Grade Center view to only show a single grading period, the total column appears also. Carefully consider which rows you move to the first table. For example, you filter your view to show only the Assignment category. But, you moved a test column to the first table. Because the test column appears in all views, it will appear with the assignment columns in the grid.
- Reorder grading period tables and columns. Use the drag-and-drop function. Expand and collapse the contents with the plus and minus icons. For column reorder, select columns' check boxes and make a selection from a menu.
- Sort columns. Access the column's menu and set an ascending or descending order.
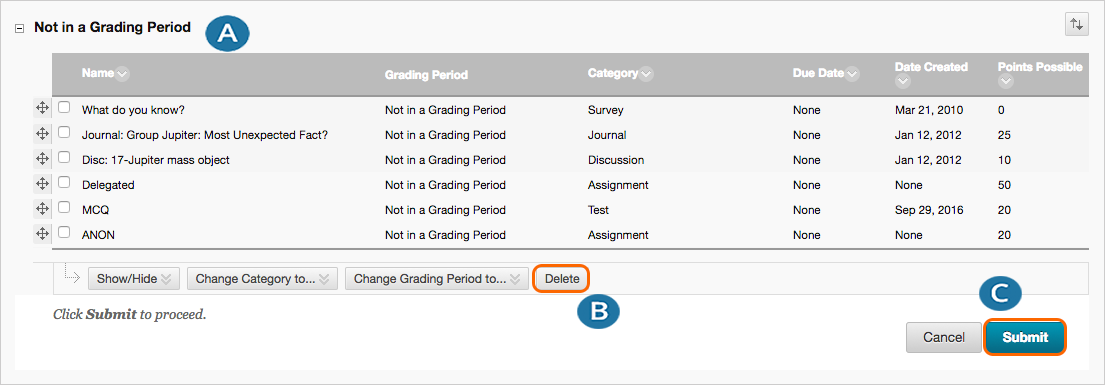
- Last table. Not in a Grading Period shows columns not associated with an existing grading period. Alternatively, the table is named Shown in Selected Views Only, and all grade and calculated columns appear.
- Delete. Select columns' check boxes to delete multiple columns. Deleting items is irreversible.
- Submit. Select Submit to save changes. If you try to navigate away from this page without submitting, a pop-up window warns you to save the changes.